|
|
There is almost not a Microsoft Windows 7, Vista or XP tip, trick or registry hack that is not described elsewhere on the web.
But occasionally we run across something that we haven't seen somewhere else. We have collected those tips, tricks and registry hacks on this page. Most of these tips will work on all Windows NT based (Windows 7, Vista, XP and 2000) 32 bit unless otherwise stated. They will probably for the most part also work on 64 bit systems but some of the registry addresses may be different.
|
|
Important. Read this first.
The Tips and Tricks on this page assumes that you have an understanding of your Microsoft Windows system.
DAG-KONSULT AB give no warranty, -implied or otherwise, or assumes any responsibility for the accuracy of these tips or as to their suitability on your system. Read more on our Legal page.
********** WARNING **********
Some tips on this page require tampering with Windows Registry. Using Registry Editor incorrectly can cause serious, system-wide problems that may require you to reinstall Windows to correct them. There is no guarantee that any problems resulting from the use of Registry Editor can be solved. Use this tool at your own risk.
*****************************
|
| |
 |
000005B3: ERROR_REQUIRES_INTERACTIVE_WINDOWSTATION. |
|
| |
|
|
When you try to install a printer in your windows Vista system you receive the following error message:
000005B3: ERROR_REQUIRES_INTERACTIVE_WINDOWSTATION.
This may happen if you have bought a machine with Vista preinstalled and on which you, when finalizing the installation, are presented with multiple language choices and your chosen language doesn't mach your keyboard choice. E.g. you chose English language for the OS and e.g. a Swedish keyboard during the initial install process.
There is a workaround however. During the first important initial installation you chose the OS language and matching keyboard layout, in this example English OS and English keyboard. In another example you would chose Swedish language OS and the matching Swedish keyboard.
Then, after finalizing the installation; in this example add the Swedish keyboard, making it the default. To do so launch Regional and Language Options from Control Panel, click the Keyboards and Languages tab, and click Change Keyboard.
|
|
|
|
|
Windows Vista.
|
|
| |
|
Add an additional Time Server for syncronizing time in Windows XP. |
|
| |
|
|
With Windows XP you can let the system synchronize the PC clock with a Time Server on the Internet. The problem is that it's not always reachable. You can easily add more time servers. Find the key
HKEY_LOCAL_MACHINE\SOFTWARE\Microsoft\Windows\CurrentVersion\DateTime\Servers\. In the
right pane you find the two default Time Servers. To add one or more of your own, add a new
String Value. Set a name that follows the other two in chronological order. The two that are already there have 1 and 2 so your new server address should be 3 then 4 etc.
Double click on the new value and fill in the Web address for the new server.
One server which is always reachable is the Time Server at Lund's Tech University, Sweden. It has the Web address ntp.lth.se
|
|
| |
|
Add or Remove Programs. Uninstalled programs still show up in the list. |
|
| |
|
|
When you uninstall programs it still show up under Add or Remove Programs. To clean up your Add or Remove Programs list start the Registry Editor (go to Start, Run and type Regedt32). Find the key HKEY_LOCAL_MACHINE\SYSTEM\SOFTWARE\Microsoft\ Windows\CurrentVersion\Uninstall. Find the programs' subkeys ad remove them.
Restart your system for this change to take effect.
|
|
| |
|
Automatically diagnose and fix common problems with Windows Update. |
|
| |
|
|
Microsoft has an excellent article (kb906602) which describes how to troubleshoot common Windows Update, Microsoft Update, and Windows Server Update Services installation issues. There is also a very good FixIt tool which automatically diagnoses and fixes common problems with Windows Update.
Read more at http://support.microsoft.com/kb/906602.
|
|
|
|
|
Works with all current versions of Windows.
|
|
| |
|
Backing up Windows 7 Home Premium to a network. |
|
| |
|
|
If you want to backup your Windows 7 installation there is an excellent tool, Backup and restore under Control Panel > System and Security. The only shortcoming is that unless you have the Business or Ultimate version of Windows 7 backup to a network is gone. It was there in Windows Vista but is gone in
Windows 7.
However, you can backup your Windows Home Premium to a network following this workaround.
- Disk Management > Create VHD (Virtual Hard Drive) on the NETWORK.
- Attach/Mount VHD (automatic upon creation) > Initial & Assign local drive letter.
- Backup to VHD saved on the network.
|
|
|
|
|
Works with Windows Seven.
|
|
| |
|
Balloon Tips can not be permanently disabled. |
|
| |
|
|
Even though you disabled Balloon Tips according to the instructions below you still receive annoying Balloon Tips. If you open the Registry Editor and navigate to the value EnableBalloonTips you will notice that the value has been reset to 1. Hence, you now get Balloon Tips and resetting the value to 0 will have no effect, on your next logon the value will be 1 again.
This seems to be a particularly common problem with Netbooks.
The probable culprit here is the WIDCOMM Bluetooth tray service. The obvious solution is to set the value to 0 and remove the Bluetooth startup shortcut from the Startup folder but that is a solution with some drawbacks. Should you require the service for some reason starting the service will immediately set the value to 1 and you have to open the Registry Editor and manually reset the value to 0 again.
A much better solution is to permanently block the WIDCOMM Bluetooth tray service from accessing the registry value. To do so click on the DWORD value and then go to Edit and Permissions. This will open the Permissions for Advanced window and you will see a list of users, click on Advanced which will open Advanced Security Settings for Advanced. In the Permissions tab click on the first user and go to Edit. This will open Permission Entry for Advanced. Check the Deny box for Set Value but leave everything else unchecked. Repeat this for every user, even System. Close the Registry Editor and reboot your computer and the Balloon Tips should be gone.
|
|
|
|
|
Works with Windows XP, Vista and Seven.
|
|
| |
|
Briefcase Icon. |
|
| |
|
|
Admit that the default Briefcase Icon on
your desktop looks dull. There is a way to
replace it with a new and shiny metal
Attaché case.
Start the Registry Editor (go to Start, Run
and type Regedt32). Find the key
HKEY_CLASSES_ROOT\CLSID\{85BBD0920-42A0-1069-A2E4-08002B30309D}\DefaultIcon. Double click on the
value in the right pane. It should end with
Syncui.dll,0. Change it to
Syncui.dll,1.
Restart your system for this change to take
effect.
|
|
|
|
|
Works with Windows
95/98, NT and Windows 2000.
|
|
| |
|
CD Burn rights. |
|
| |
|
|
As long as you are logged in as the system Administrator
CD premastering software like Nero will work flawless. But when you
are logged in as an ordinary user you will get a massage like this:
"Under Windows NT4/2000 burn rights are required by Nero to access cd
recorders and cd-rom/dvd-rom drives. Please ask your system administrator
for a permission to use Nero."
You get this message because Windows 2000 and Windows XP do not grant
access to low level drivers for users without administrative rights
To solve this.
- Go to Start, Settings and then
Control Panel.
- Click on Administrative Tools
and then Local Security Policy.
- Navigate to Security Settings, Local
Policies, Security Options and then to
Restrict CD-ROM
access to locally logged-on user
only.
(Under Windows XP you should navigate to
Device: Restrict CD-ROM access to
locally logged-on user only.)
Right click and then on Security...
to open.
- Click Enabled and then
OK.
This will also increase your security but have consequences if users
try to access a shared CD-ROM on your computer.
See Microsoft KB article Prompted for CD-ROM When You Run System File
Checker While Correct CD-ROM Is in Drive (Q263499).
If you don't want to change your Security Settings, Ahead Software
has made a tool that will help you grant access to low level drivers
for users without administrative rights. Thus making it possible for
them to burn CDs with Nero. Download Nero
BurnRights from here.
|
|
| |
|
Change Drive Name and Icon. |
|
| |
|
|
When you install your new DVD player you
will find that it's still represented by the
same old icon as your old CD player and even
worse, it's also labeled Compact Disk.
To change the Drive Name or Icon (e.g. on your
DVD drive). Start the Registry Editor (go to
Start, Run and type Regedt32). Find the key
HKEY_LOCAL_MACHINE\SOFTWARE\Microsoft\Windows\CurrentVersion\Explorer. If the key
doesn't exist add the new sub-key
DriveIcons. Create a new sub-key
D (D representing the drive
letter of the drive you want to modify). Under
the drive letter create the new sub-key
DefaultIcon and set the
REG_SZ string value to equal the fully
qualified name of the icon file.
To change the drive description e.g. in
Explorer, under the drive letter (D in this
example) create the new sub-key
DefaultLabel and set the
REG_SZ string value to whatever name you want
the drive to appear as in Explorer (e.g. DVD
Disk).
After you're done you should have two registry
keys looking like this:
HKEY_LOCAL_MACHINE\SOFTWARE\Microsoft\Windows\
CurrentVersion\Explorer\DriveIcons\D\
DefaultIcon and:
HKEY_LOCAL_MACHINE\SOFTWARE\Microsoft\Windows\
CurrentVersion\Explorer\DriveIcons\D\
DefaultLabel
Restart your system for this change to take
effect.
|
|
|
|
|
Windows all versions.
NOTE: "DefaultLabel" value only works
with Windows 2000 and higher.
|
|
| |
|
Compatibility-Mode in Windows 2000
Service Pack 2. |
|
| |
|
|
Windows 2000 provides an environment to run
older programs, Win95 or NT4 programs, that
experience issues with Windows 2000 in
Compatibility-Mode. Compatibility-Mode more
closely reflects the behavior of either Windows
95 or Windows NT4.
Compatibility-Mode is installed with Windows
2000 Service Pack 2 but is not enabled by
default. To enable Compatibility-Mode:
- Log on as Administrator.
- Click Start, and then
Run.
- In the Open box type the
following:
regsvr32
%systemroot%\apppatch\slayerui.dll
- Click OK.
Now you can right-click on a shortcut, then
on Properties and then on the
Compatibility tab. (This tab will only
appear if the Compatibility-Mode Interface has
been properly enabled on the computer). Select
either Windows 95 or Windows NT4
in the drop-down box.
NOTE: Be vary careful if you use
Compatibility-Mode to bypass version warnings
in Setup or installation programs. Some
software are designed for specific operating
systems and can have the potential to cause
serious problems if installed.
|
|
|
|
|
Windows 2000
only.
|
|
| |
|
Device Manager- Show Hidden
Devices. |
|
| |
|
|
The Device Manager normally only display the
Plug and Play units that presently are
installed. A not connected USB unit for example
or an external modem that is not turned on is
not visible at all. Even if you choose "Show
Hidden Devices" this behavior will not
change. If this is activated installed "Non
Plug and Play" devices will be displayed but
not Plug and Play devices that are not
presently connected. This behavior can be
changed.
- Log on as Administrator.
- Click Start, Settings,
Control Panel, and then
System.
- Click on the Advanced tab and
then on Environment
Variables...
- Add a new System Variable to the lower
pane. The variable name should be
devmgr_show_nonpresent_devices with
the value 1.
- Click OK.
These devices will now be displayed grayed
out but only when "Show Hidden Devices"
is checked.
Restart your computer for this change to
take affect.
|
|
| |
|
Disable Balloon Tips in Windows XP, Vista and 7. |
|
| |
|
|
If you find the various pop-up warnings that appear in balloons above the system tray annoying you can easily turn them off.
Start the Registry Editor (go to Start, Run
and type Regedt32). Find the key
HKEY_CURRENT_USER\Software\Microsoft\Windows\CurrentVersion\Explorer\Advanced
and add the DWORD value
EnableBalloonTips. To turn of Balloon Tips the value should be set to 0.
To turn on Balloon Tips set the value to 1.
|
|
|
|
|
Windows XP, Vista and 7.
only.
|
|
| |
|
Disable the Passport pop-up in
Windows XP. |
|
| |
|
|
The first several times you start Windows
XP. you'll get various pop-up warnings that
appear in balloons above the system tray.
You'll se one that says, in part, You need a
Passport to use Windows XP Internet
communication features... and to access
.NET-enabled services on the Internet.
Don't be fooled by this in to believing that
you must set up a Passport account in order to
use the Internet.
Dismiss the pop-up by clicking the X-icon at
its top right. If you click anywhere else,
you'll start the process of creating a Passport
account.
As with other Windows systems there is also
a way to do this by editing the Registry.
Start the Registry Editor (go to Start, Run
and type Regedt32). Find the key
HKEY_CURRENT_USER\Software\Microsoft\MessengerService
and find the binary value
PassportBalloon. Double-click
it, delete the old value and enter
0A.
The value should now be 0A 00 00
00.
On a multi-user computer you will probably
want to do this for each account.
Windows XP keeps a count in the Registry of
how many times the Passport balloon has been
displayed and it stops after you have logged on
to your account ten times. The Registry hack
above stops it by setting the counter to
ten.
|
|
|
|
|
Windows XP
only.
|
|
| |
|
Disable Automatic Document Shortcuts in My Network Places. |
|
| |
|
|
Every time you open a document via a network -from a resource without a drive letter- Windows will automatically create a short cut to that document in My Network Places. If you open a lot of document this way the list in My Network Places soon becomes cluttered and confusing. This makes this function less useful.
To turn of this function start the Registry Editor (go to Start, Run and type Regedt32). Find the key HKEY_CURRENT_USER\Software\Microsoft\Windows\CurrentVersion\Policies\Explorer
and add the DWORD value
NoRecentDocsNetHood. Set the value to 1.
To turn on the function set the value to 0.
|
|
|
|
|
Windows XP/2000/ME.
|
|
| |
|
Disable "To get future Google Chrome updates, you'll need Windows 10 or later". |
|
| |
|
|
When you update Google Chrome to version 108.0.5359.72 or higher you get a constant notification "To get future Google Chrome updates, you'll need Windows 10 or later. This computer is using Windows X.X."
To disable this annoying notification create a text file with the .reg extension and double click on it to enter the value into registry, then restart Chrome. The text file should have the following content:
Windows Registry Editor Version 5.00
[HKEY_CURRENT_USER\Software\Policies\Google\Chrome]Explorer\AdvancedSuppressUnsupportedOSWarning"=dword:00000001
Or when you update Microsoft Edge to version 108.0.1462.42 or higher and get the constant notification "To get future Microsoft Edge updates, you'll need Windows 10 or later. This computer is using Windows X.X."
Create a text file with the .reg extension and double click on it to enter the value into registry, then restart Edge. The text file should have the following content:
Windows Registry Editor Version 5.00
[HKEY_CURRENT_USER\Software\Policies\Microsoft\Edge]SuppressUnsupportedOSWarning"=dword:00000001
|
|
|
|
|
Windows 7, and 8.1.
|
|
| |
|
Enable Routing in Windows 2000
Professional. |
|
| |
|
|
If you install multiple network cards (NICs)
in a computer running Windows 2000 Professional
there is no really convenient way to enable
routing. Yet, if you want the computers on the
different networks to be able to talk to each
other you need to enable routing on the
computer where the multiple network cards are
installed.
Both Windows NT Workstation and Server offer
convenient dialog boxes (under the
Network/Protocols/Routing tab and tick "Enable
IP Forwarding") to enable routing and so does
Windows 2000 Server.
Windows 2000 Professional is different,
though. To enable routing in Windows 2000
Professional you need to use Regedt32 and find
the key:
HKEY_LOCAL_MACHINE\SYSTEM\CurrentControlSet\Services\Tcpip\Parameters
and select IPEnableRouter.
To enable IP routing for all network
connections installed on this computer, assign
a value of 1.
To do this, click on the value
IPEnableRouter, go to the
Menu, click on Edit, and then click on
DWORD.
In Windows 95/98/Me the Registry Key
is:
HKEY_LOCAL_MACHINE\SYSTEM\CurrentControlSet\Services\VxD\MSTCP
and select EnableRouting and
assign a value of 1.
You need to reboot your computer for this
change to take effect.
NOTE: Routing between networks using
a software router (e.g. a computer running
Win95/98/Me/NT4/2000) only works when routing
Ethernet networks or Ethernet - USB networks.
To route a 802.11b Wireless network you must
use an Access Point with a router.
|
|
| |
|
Function "Open with" in
Explorer. |
|
| |
|
|
When you right click on a file in Explorer
and use the function "Open
With…" the check box
"Always use this program to open
this type of file" often is
automatically checked, thus making it easy to
accidentally change a file association.
With a simple Registry hack you can make sure
that you always have to check this yourself,
should you like to do such a change. Use
Regedt32 and find the key:
HKEY_CLASSES_ROOT\Unknown\shell\openas\command.
Under that key is a string that looks like
this:
%SystemRoot%\system32\rundll32.exe
%SystemRoot%\system32\shell32.dll,OpenAs_RunDLL
%1
Open the value and add %2 preceded by a space,
as the last entry in the string:
%SystemRoot%\system32\rundll32.exe
%SystemRoot%\system32\shell32.dll,OpenAs_RunDLL
%1 %2
|
|
|
|
|
Works with Windows
95/98, NT and Windows 2000.
|
|
| |
|
Function "Open with" always
available. |
|
| |
|
|
If you press shift when you right click on a
file in NT Explorer you get an extra
alternative on the right click menu,
"Open With…". If
you like to have this alternative every time
you right click on a file in NT Explorer you
can add this option by editing your
Registry.
The easiest way to achieve this is to open
NOTEPAD and write the
following lines and save the file with the
ending .reg.
REGEDIT
4
[HKEY CLASSES
ROOT\*\shell\openwith]
[HKEY CLASSES
ROOT\*\shell\openwith\command] |
Double click on the file and click
yes when prompted if you like
to add the information to the Registry.
************ CAUTION
************
This will add this option to all file
types.
********************************
If you just want to add this option to
selected file types you can of course do this
by opening Registry and make the change to the
selected file type.
|
|
|
|
|
Works with Windows
95/98, NT and Windows 2000.
|
|
| |
|
Increase toolbar icon size in Internet Explorer 9. |
|
| |
|
|
If your Windows 7 came with Internet Explorer 9 pre-installed or if you upgrade from IE8 to IE9 you might find out that your toolbar icons are too small. If you like your tool bar icons larger there is a registry hack that will set them to large. To increase your IE9 icons go open the Registry Editor and navigate to
HKEY_CURRENT_USER\Software\Microsoft\Internet Explorer\CommandBar. Add the DWORD SmallIcons and set the value to 0.
|
|
|
|
|
Windows 7 with IE 9.
|
|
| |
|
Increased security. Clear virtual
memory pagefile on system shut down. |
|
| |
|
|
An extra security precaution is to clear the
virtual memory pagefile on system shut down, so
that no one with access to the hard drive can
use it to search for information.
- Go to Start, Settings and then
Control Panel.
- Click on Administrative Tools
and then Local Security Policy.
- Navigate to Security Settings, Local
Policies, Security Options and then to
Clear virtual
memory pagefile when system shuts
down. Right click and then on
Security... to open.
- Click Enabled and then
OK.
Note: One side effect on a system
with a very large pagefile is that system shut
down will take longer. This is because the
shutdown process must physically write to each
page in the pagefile to clear the page.
|
|
|
|
|
Windows 2000 and
Windows XP.
|
|
| |
|
Increased security. Disable
POSIX. |
|
| |
|
|
Windows 2000 and XP still come with the
POSIX subsystem. The POSIX allows the use of
Unix commands. By disabling POSIX you prevent
hackers from using Unix commands against your
system.
To disable POSIX.
- Use Regedt32 and find the key:
HKEY_LOCAL_MACHINE\SYSTEM\CurrentControlSet\Control\Session Manager\SubSystems.
- Click on the multistring called
Optional in the right
hand pane. Delete the value POSIX
and leave the space empty (don't delete the
Optional multistring).
- Then click on the POSIX
multistring in the same pane. It will point
to a file in your Windows System32 folder
called Psxss.exe. Using Windows
Explorer delete or rename the file
Psxss.exe then use Regedt32 to
delete the POSIX multistring.
Note: One side effect on a system
with a very large pagefile is that system shut
down will take longer. This is because the
shutdown process must physically write to each
page in the pagefile to clear the page.
|
|
|
|
|
Windows 2000 and
Windows XP.
|
|
| |
|
Increased security. Prevent
creating Dump file and DrWatson32.log
file. |
|
| |
|
|
The Dump file or the DrWatson32 log file may
be helpful when diagnosing a system crash, but
like the swap file they can also present a
security risk, storing a lot of sensitive,
unencrypted data.
To prevent Windows from creating the Dump
File:
- Go to Start, Settings and then
Control Panel.
- In the Control Panel click on
System and then the Advanced
Tab.
- Click on the Settings button on
the Startup and Recovery pane. Set
the drop-down menu under Write debugging
information to (none).
To disable DrWatson and to prevent it from
creating the DrWatson32.log file:
- Use Regedt32 and find the key:
HKEY_LOCAL_MACHINE\SOFTWARE\Microsoft\WindowsNT\CurrentVersion\AeDebug.
- Set the Auto string
to 0.
- Then use Windows Explorer and go
to Document and Settings\All
Users\Shared Documents\DrWatson\.
DeleteUser.dmp and
DrWatson32.log.
|
|
|
|
|
Windows 2000 and
Windows XP.
|
|
| |
|
Increased security for NetBios over
TCP/IP. |
|
| |
|
|
Many hacker attacks derive from so called
"null-session attacks". In short, a
null-session attack means that the hacker logs
on anonymously and have access to all of that
groups user rights. This is possible with the
NetBios protocol. The hacker then lists
usernames and workgroups or tries to find the
name for the administrator account should that
have been renamed. One way to increase security
is to add a value to the Registry Key:
HKEY_LOCAL_MACHINE\SYSTEM\CurrentControlSet\Control\Lsa.
This value should be:
RestrictAnonymous and should
be of the type: REG_DWORD and
the value set to: 1.
Adding this value to the Registry Key will
prevent some of the information leakage but not
all.
|
|
|
|
|
Works with Windows NT4
service pack 3 or higher.
|
|
|
|
|
Note: With Windows
2000 and XP Microsoft has already added
the value to that key but it is set to 0 by
default. To increase your security you should
change this value to 1. If you have only
Windows 2000 in your network and therefore
don't need to worry about legacy support you
can disable NetBios over TCP/IP totally. You do
so under "Advanced TCP/IP Settings" and under
the WINS tab, choose "Disable NetBios over
TCP/IP". Found under "Network and Dial-Up
connections" in the Control Panel. This will
further increase your network's security.
Windows NT4, Windows
2000 and XP.
You can read more here about how to change the
Local Security Policy to completely disable
"null-sessions"
here.
|
|
| |
|
Increased security. Turn of Windows
XP, IExplorer and Office XP Bug Report. |
|
| |
|
|
In the event of a program crash with
Microsoft Internet Explorer version 5 and 6,
Office XP and also Windows XP the user have the
option to send debugging information to
Microsoft. In theory this sound like a smart
function which should help Microsoft create
more stable software. However, users sending
these reports should be aware that sensitive or
personal information may be sent to Microsoft
along with debugging information. The relevant
dialog box does not make it obvious that the
contents of the document being edited may be
sent along with information about the program
crash.
|
|
|
|
|
Users or corporate IT staff may wish to turn
of this function. The U.S. Department of
Energy's Computer Incident Advisory Capability
office (CIAC) has released an excellent
security bulletin. At their site you can learn
how and also download scripts that does the job
of disabling this function in IExplorer and
Office XP for you.
Read it and learn how here.
To disable this function in Windows XP
itself go to Start, Control
Panel and then
System in System
Properties open the
Advanced tab and then to
Error
Reporting click
Disable Error Reporting.
Click OK twice.
Or you can make the following changes to the
registry. Open Regedit and find the key:
HKEY_LOCAL_MACHINE\SOFTWARE\Microsoft\PCHealth\ErrorReporting.
Change the DoReport Value
Name, a REG_DWORD data type,
and set the data value to 0
to disable sending.
|
|
| |
|
Installing Windows 7 on a Compaq 730EO (HP Mini). Bluetooth doesn't work. |
|
| |
|
|
Installing Windows 7 Home Premium (or any other skew of Windows 7 for that matter) replacing the original Windows XP installation is easy. Everything should work as before, camera, wireless network card etc. are identified and installed correctly. But, there is one caveat though; Bluetooth is nowhere to be found. No drivers are installed and it doesn’t turn up in Device Manager.
If you try to install the Bluetooth drivers you are told to go to the Device Manager to turn Bluetooth on!
But how do you do that if it’s not in Device Manager?
There is an easy solution to this dilemma though. You probably remember that your old XP installation had something called HP Wireless Assistant.
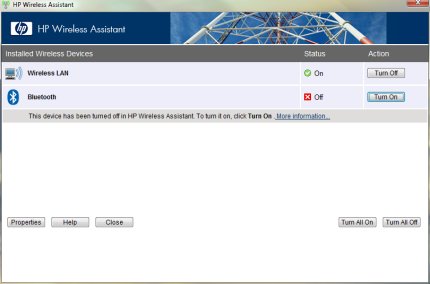
This is what you need to install prior to installing any Bluetooth driver packages.
The HP Wireless Assistant is sp45222.exe and should be found on the HP Web Site.
After installation and a reboot you will now see Bluetooth in the Device Manager. Make sure it’s turned on. Then download and install sp49153.exe which also should be found on the HP Web Site (Make sure you download both packages from a legitimate HP Web Site or FTP). Installing sp49153.exe will take awhile and require an Internet connection since sp49153.exe will contact Microsoft for the correct updated drivers etc.
After a reboot you should now have a proper functioning Bluetooth just as you had on your old XP installation.
|
|
|
|
|
Windows 7 (and probably Vista too).
|
|
| |
|
Internet Explorer Fitted-Width Printing. |
|
| |
|
|
Have you ever printed a web page only to find that the right-hand edge is missing? This is for you. First, this download page will install the control. If you have blocked installation of ActiveX controls you need to temporarily allow installation of ActiveX controls. After installation, close the browser window and reopen a new one. You should have a new printer icon with a small 'W' next to it on the toolbar, if you don't, right click on the toolbar and choose customize and find the icon in the left pane. When you have the icon on the toolbar, press this to bring up a print dialog which will then print the page fitted to the width of your paper. Alternatively, hold down the Control key while pressing the button and you will get a print preview instead.
|
|
|
|
|
Applies to all
versions of Windows with Internet Explorer
installed.
|
|
| |
|
Internet Explorer - Increase the
number of concurrent downloads. |
|
| |
|
|
By default Internet Explorer limits the
number of concurrent downloads to two. This
limitation make sense with a modem connection
but not so much if you have a broadband
connection. If you want to increase the number
of concurrent downloads this can easily be
achieved through a Registry hack.
Start the Registry Editor (go to Start, Run
and type Regedt32). Find the key
HKEY_CURRENT_USER\Software\Microsoft\Windows\CurrentVersion\Internet
Settings. Create a new REG_DWORD
value of
MaxConnectionsPerServer then
create yet another REG_DWORD value of
MaxConnectionsPer1_0Server.
Set both values to the number of concurrent
downloads you want to be able to do. A number
higher than 8 is not recommended.
Restart your system for this change to take
effect.
|
|
|
|
|
Applies to all
versions of Windows with Internet Explorer
installed.
|
|
| |
|
Internet Explorer 6 - Turning Off
the Image Toolbar. |
|
| |
|
|
If you don't like the new IExplorer 6
browser feature, the Image Toolbar, it can
easily be turned of.
- On the IExplorer Menu Bar click
on Tools and then Internet
Options.
- Click on the Advanced tab.
- Navigate to Multimedia and
untick Enable Image
Toolbar (requires restart).
- Click OK.
Read more about Internet Explorer 6 and its
new features
here.
|
|
|
|
|
Applies to all
versions of Windows with Internet Explorer 6
installed.
|
|
| |
|
Internet Explorer 8 - InPrivate Filtering always on. |
|
| |
|
|
Configuring InPrivate Filtering to be always on. InPrivate Filtering is something many users appreciate but the default behavior of IE8 is that the user needs to manually trigger this every browser session. To overcome this and always start IE8 with InPrivate Filtering there is a Registry setting to start InPrivate Filtering with every browser session (this setting can than of course be manually changed during the session).
Start the Registry Editor (go to Start, Run and type Regedt32). Find the key HKEY_CURRENT_USER\Software\Microsoft\Internet Explorer\Safety\PrivacIE. Create a new REG_DWORD value of StartMode then set the value to 1 or 2 for "Choose content..." or 0 for Off.
Restart your system for this change to take effect.
|
|
|
|
|
Applies to all versions of Windows with Internet Explorer 8 installed.
|
|
| |
|
IP - Alternate Configuration. |
|
| |
|
|
If you often move your laptop between two
locations, like between your office and your
home, and one of your locations requires a
static IP address, the alternate IP
configuration feature under TCP/IP in Windows
XP can be handy. You can then specify that IP
address, gateway and DNS server address
information in the Alternate
Configuration tab of the TCP/IP
Properties.
When your computer starts it automatically
attempts to obtain an address from a DHCP
server. If no DHCP server is found, the
alternate IP address information is used.
If a DHCP server is found (which is normally
the case on e.g. your home network with an
Internet connection), the system uses the
DHCP-provided address instead.
|
|
|
|
|
Applies to Windows
XP.
|
|
| |
|
IrDA - Installing Virtual Infrared
COM Port under Windows 2000 and Windows
XP. |
|
| |
|
|
Under Windows 2000, infrared devices are no
longer handled as a Serial COM device and there
is no native support in Windows 2000 for
Virtual Serial Ports.
However, to use certain devices, such as Cell
Phones for dialing an Internet Service Provider
to have Internet access while on the road, or
to be able to synchronize your Cell Phone with
Outlook on your computer, you need to install
software that treats the IrDA device as a
Serial COM device.
Provided that you have an IrDA Infrared
Adapter already installed and configured on
your computer you can download the software
Irdaw2k and install it on your computer. This
will give you a Virtual Infrared COM port on
your computer.
You can download Irdaw2k from
http://www.cyber-mill.com/irdaw2k.zip.
However, those drivers are kind of old now and
they haven't worked well with Windows XP. There
is a more recent driver that works really well
with both Windows 2000 and Windows XP at
http://www.stud.uni-hannover.de/~kiszka/IrCOMM2k/English/index.html
After unzipping the files to a folder just
run Setup. The setup program will run as a
silent install and requires no interaction on
your part. After short time you will se a
dialog that says that Virtual COM was
successfully installed. Just press OK. A
Virtual Infrared COM port has been added to
your COM ports.
There are some issues though. To be able to
successfully use synchronization software such
as TrueSync or your Cell Phone as a modem you
may, depending on your software or device, have
to go to Start, Settings, Control Panel
and open Wireless Link. In Wireless
Link click on the
Image Transfer
tab and untick "Use
Wireless Link to transfer images from a
digital camera to your computer." and
"Explore location after receiving
pictures."
|
|
|
|
|
Applies to Windows
2000 and Windows XP.
Windows 95/98, NT4 already supports Virtual
COM Ports.
|
|
| |
|
Irftp - A convenient way to
transfer files between Infrared capable
Units. |
|
| |
|
|
If you need a convenient way to transfer
files to and from other Infrared capable units,
e.g. handheld devices or laptops, you can do
the following.
- Click Start, and then
Run.
- In the Open box type
irftp
- Click OK.
This will open an easy to use Wireless Link
dialog box.
Use it much? Create a shortcut on your
Desktop.
|
|
|
|
|
Applies to Windows
2000.
|
|
| |
|
Opening an Office application messes up the clipboard. |
|
| |
|
|
Symptom: You copy something to Windows Clipboard. Thereafter you open your Office application, e.g. Word, Excel, Outlook or Access, and try to paste what you previously copied. Instead of the image or text you previously copied you get something like a black blob. Open any other application like Photoshop after you opened your Office application and try to paste into that application and you probably see the same result, no text or image just a blob.
The culprit here is in all probably an Office add-in, the Send to Bluetooth from Motorola (btmoffice.dll) add-in.
Fixing this is easy, just open the Office application in which you have trouble and go to Options, Add-ins. When the add-ins manager opens look at the bottom (in Office 2007) for Manage and make sure the drop-down list is set to COM Add-ins and the click on the Go button.
Untick the Send to Bluetooth tick box and then OK. The next time you restart your office application the problem should be solved. Note that you need to do this for every Office application with the Send to Bluetooth add-in enabled, you need to open them one by one, Word, Excel etc.
There is also one caveat depending on your UAC settings. When you try to untick the tick box you might encounter “This add-in is installed for all users on this computer, and can only be connected or disconnected by an administrator” even if you have administrator privileges. If so, right click on the Office shortcut, Properties and go to the Compatibility tab and under Privilege Level tick the Run this program as an administrator tick box.
|
|
|
|
|
Office 2003, 2007 and 2010.
|
|
| |
|
Outlook Express, how to prevent long delay when
opening after removing Windows Messenger. |
|
| |
|
|
If you remove Windows Messenger or prevent it from
starting you will experience a long delay when you start Outlook Express
if you have the Contacts pane enabled.
This is because Outlook tries to start Windows Messenger before firing
up. To prevent a long delay when opening Outlook Express if you have
the Contacts pane enabled.
Start the Registry Editor (go to Start, Run and type Regedt32). Find
the key HKEY_LOCAL_MACHINE\Software\Software\Microsoft\Outlook
Express. Click in the right pane and create a new REG_DWORD
value Give it the name Hide Messenger. Set the value
to 2.
|
|
|
|
|
Windows XP.
|
|
| |
|
Outlook
blocked access to the following potentially
unsafe attachments: [...]. |
|
| |
|
|
Outlook 2002 includes a new security feature
that blocks attachments considered unsafe. If
you receive an e-mail message that contains one
of the blocked file types, you will see the
following warning message:
Outlook blocked access to the following
potentially unsafe attachments:
[...]
Although access to the attachment has been
blocked, the attachment still exists in the
message.
Of course you can manipulate the registry to
allow access to these attachments. Or you can
let this applet,
Outlook 2002 Attachment Security
Unlock Applet, from
Visiontech do it for you.
|
|
|
|
|
Outlook 2002
Attachment Security Unlock Applet requires
Outlook 2002. It will not work with Outlook
2000 or lower.
|
|
| |
|
How do to add the Outlook 2003 Icon to the desktop. |
|
| |
|
|
Once you have installed Outlook 2003, you may notice that the Outlook Icon is no longer placed on the desktop. This change was made because of Microsoft's new "clean desktop" strategy under which a Windows Logo Certified program is no longer allowed to put a Default Icon on the desktop.
To get the Icon back on the desktop open the Registry Editor. Find
the key HKEY_CURRENT_USER\Software\Microsoft\Windows\CurrentVersion\Explorer\Desktop\NameSpace\.
On the Edit menu, click Add Key, and then add the following registry key: {00020D75-0000-0000-C000-000000000046}. This adds the Icon to the current logged on user. To add the Icon to all users on the computer, instead add the key to: HKEY_LOCAL_MACHINE\Software\Microsoft\Windows\CurrentVersion\Explorer\Desktop\NameSpace\.
Notice: The Outlook Icon did, with Outlook XP and below, provide some additional MAPI profile configurations if right-clicked. This may no longer work with the Outlook 2003 Icon and Explorer may instead tend to crash if the Icon is right-clicked. |
|
|
|
|
Works with Outlook 2003.
This tip will also work with all other versions of Outlook if you accidentally have deleted the Outlook Icon from the desktop.
|
|
| |
|
Outlook; you can't remove "Attach as Adobe PDF"
from the New Mail toolbar. |
|
| |
|
|
After you installed Adobe Acrobat 6 you find that you have
a new button on the New Mail toolbar in Outlook and even if you remove
it it comes back.
Start the Registry Editor (go to Start, Run and type Regedt32). Find
the key HKEY_LOCAL_MACHINE\Software\Microsoft\Office\Outlook\Addins\PDFMOutlook.PDFMOutlook\.
Find the REG_DWORD value LoadBehavior. The value is
set to 3 =the button is visible in the Outlook toolbar.
Set the value to 0 =the button will not show in the
toolbar the next time you want to send an e-mail. You can always reset
the value to 3 if you want the button to reappear in the toolbar.
|
|
|
|
|
Works with Outlook 2002 or 2003
and Adobe Acrobat 6.
It may or may not work with other versions of Outlook and Adobe Acrobat
or combinations thereof.
|
|
| |
|
Pasting into Outlook 2007 produces blue question mark. |
|
| |
|
|
There are several reasons why this is happening and one is the above mentioned Send to Bluetooth add-in. If you instead of the black blob get a blue question mark and you have an HP computer try the following.
- go to the windows control panel and open "HP ProtectTools Security Manager"
- on the bottom left, click on "Administration"
- click on "Settings" on the left under "Applications"
- select the "Applications" tab
- uncheck "Privacy Manager"
- click "Apply" and close the window
- close and reopen Outlook
|
|
|
|
|
Works with Outlook 2003, Outlook 2007
and probably also Outlook 2010 and Outlook 2013 and above.
|
|
| |
|
Remove "Standby" option from shutdown menu. |
|
| |
|
|
On a computer with Advanced Power Management there is a Standby option under the Shut Down menu.
If you for some reason want to prevent users from having this option it can be removed with the following Registry hack.
Start the Registry Editor (go to Start, Run and type Regedt32). Find
the key HKEY_LOCAL_MACHINE\SYSTEM\CurrentControlSet\Services\ACPI\Parameters. Click in the right pane and create a new REG_DWORD
value. Give it the name Attributes. Set the value
to 00000070.
After reboot, Standby is unavailable.
|
|
|
|
|
Windows XP.
|
|
| |
|
Screen
Saver Password Protection Policy. |
|
| |
|
|
You can use this registry setting to determine whether
the screen saver is password protected and it also prevents users from
changing the password-protection setting.
Start the Registry Editor (go to Start, Run and type Regedt32). Find
the key HKEY_CURRENT_USER\Software\Policies\Microsoft\Windows\Control Panel\Desktop. Create a new REG_DWORD value of ScreenSaverIsSecure.
Then sett value to 0 =the screen saver is not password
protected or to 1 =the screen saver is password protected.
Restart your system for this change to take effect.
|
|
|
|
|
Windows 2000/XP only.
|
|
| |
|
Solid
Edge V12 Tooltips flyouts misbehave under
Windows XP. |
|
| |
|
|
When you install Solid Edge V12 under
Windows XP you will notice that the Tooltips
flyouts sometimes have a text that doesn't
correspond with the icon. The "New file" icon
will have the text "Open" etc. The manifest
files delivered with Solid Edge, which under
Windows XP directs Windows XP to load the wrong
version of Microsoft Common Controls, cause
this problem.
To correct this problem you have to delete
the manifest files located in the
Solid Edge V12\Program folder.
There are two files:
Solid Edge V12\Program\Edge.exe.manifest
Solid Edge
V12\Program\Edged.exe.manifest
This is a problem with Windows XP up to and
including Service Pack 1. Future Service Packs
may or may not include a fix.
|
|
|
|
|
Windows XP
only.
|
|
| |
|
Tweak Context Menus. |
|
| |
|
|
Context menus have become more and more useful but also more cluttered with all extra entries, options and features you don't need. Entries from programs you rarely use can clog your menu. This is how you get your menus back under control.
Open the Registry Editor, go to the Registry Key:
HKEY_CLASSES_ROOT\*\shellex\ContextMenuHandlers. Look through the list until you find the entry you want to remove. Right-click the folder of the entry and select Delete.
|
|
|
|
|
Windows 2000, XP and Vista.
|
|
| |
|
Windows 2000 hangs due to AMD AGP
paging issue. |
|
| |
|
|
Windows 2000 based computers may stop
responding when you use an Accelerated Graphics
Port (AGP) program with an AMD Athlon
processor. This is due to the memory allocated
by the video adapter driver becoming
corrupted.
AMD has issued a registry patch which can be
downloaded from
here.
Download the .reg file and double click it
to install the patch. Restart your computer for
the settings to take effect.
If you feel more comfortable creating the
registry entry yourself, go to the Registry
Key:
HKEY_LOCAL_MACHINE\SYSTEM\CurrentControlSet\Control\SessionManager\Memory Management. Create a new
DWORD value called
LargePageMinimum and set it
to 0xffffffff.
Another solution worth trying if you
experience this type of behavior with Windows
2000 and an earlier model AMD processor e.g.
K6-2 or K6-III is to go into your BIOS and find
Memory Size of AGP port,
Graphic Aperture Size or
something similar and lower the value. E.g. if
the value is 256 MB, lower it to 64 MB, if the
value is 64 MB try 8MB.
|
|
|
|
|
Windows 2000. (This
problem and solution may also apply to Windows
XP but we have not confirmed this).
|
|
| |
|
Windows 2000 and XP. How to disable
Windows 2000 SP3's/Windows XP auto
updating. |
|
| |
|
|
After installing Windows 2000 Service Pack 3
there are a few new services that you might
consider disabling to avoid that Windows, on
its own, install new updates to your system.
Updates that Windows installs in the background
and that might break other mission critical
software on your system. These new Windows 2000
features are already installed on a Windows XP
system. If you have a Windows XP computer you
too, might want to disable them using this
guide.
Go to Control Panel, Administrative
Tools, Services. Find
Automatic Updates, and change
startup type to Disabled.
Also set Background Intelligent
Transfer Service to
Disabled. While you’re
at it, Remote Registry
Service is probably also something
that you want to consider setting to
Disabled (although Remote
Registry Service is not new and part of Service
Pack 3. It was part of the original Windows
2000 installation).
Then from the Start menu,
run gpedit.msc, the group
policy editor. Go to User
Configuration, Administrative Templates,
Windows Components, Windows Update.
In order to remove access to Windows Update,
you set it to Enabled.
Notice, this will block access to all Windows
Update features but should you want them in the
future you can always turn them back on.
|
|
|
|
|
Windows 2000 and
Windows XP.
|
|
| |
|
Windows 2000/XP Disk Cleanup utility hangs. |
|
| |
|
|
If Windows 2000/XP Disk Cleanup utility freeze on start
up or hangs the system this is probably caused by the Disk Cleanup
Wizard checking for all files older than 50 days that it can compress.
To disable this behavior.
Start the Registry Editor (go to Start, Run and type Regedt32 or Regedit).
Find the key HKEY_LOCAL_MACHINE\SOFTWARE\Microsoft\Windows\CurrentVersion\Explorer\VolumeCaches\Compress
old files. Delete the Compress old files
subkey. To be able to restore it later should you change your mind you
might want to export the key before you delete it.
|
|
|
|
|
Windows 2000 and
Windows XP.
|
|
| |
|
Windows Desktop Update. |
|
| |
|
|
If you install IE 5 or IE6 on a Windows NT4
system that never had IE 4, you don't get
Windows Desktop Update (WDU), it's not included
in the IE 5 nor the IE6 update. The Windows
Desktop Update include the following
enhancements:
- The Active Desktop.
- A single, customizable Explorer with
Web View.
- A Web-integrated Start menu and
taskbar.
- Click (rather than double-click) items
to open them; point at items to select
them.
If you like to have the Windows Desktop
Update installed, without the hassle to have to
uninstall IE 5, installing IE 4 with WDU and
then reinstalling IE 5, execute the following
command from the folder that contains
IE5Setup.exe:
IE5Setup.exe /C:"ie5wzd /e:IE4Shell_NTx86
/I:Y" or you can use:
IE6Setup.exe /C:"ie6wzd /e:IE4Shell_NTx86
/I:Y" if you have IE6Setup.exe.
This command will download and install the
necessary files.
Note. For Win95 the switch is:
IE5Setup.exe /C:"ie5wzd /e:IE4Shell_WIN /I:Y".
There is no installation of IE6 under Win95. To
install IE6 under NT4 Service Pack 6a is
required.
NOTE: There is method to install the
Windows Desktop Update component directly from
the Internet Explorer 5.0
setup process all at once described at
NTFAQ.com.
You should use the method at the NTFAQ.com
site if you want to add the Desktop Update and
install IE all at once or if trying to upgrade
the desktop component under Win98 1st edition
(to use the method at NTFAQ.com for Win98 edit
the 'iesetup.cif' file & in the
[IE4Shell_Win] section change the part that
reads 'Platform=Win95' to
'Platform=Win95,Win98' & change
'UIVISIBLE=0' to 'UIVISIBLE=1' and save the
file; this method won't work with IE 6 because
the desktop update is not included for
Win95/98).
Win98 2nd edition & higher users don't
have to do this as they already have the latest
versions of the desktop component.
Many thanks to Emmanuel Piring for
pointing out this method and for pointing out
that IE6Setup.exe was also possible to use.
|
|
|
|
|
Works with Windows 95,
Windows 98 1st edition and NT.
Windows 98SE/Me and Windows 2000/XP already
have Windows Desktop Update as an integrated
part.
|
|
| |
|
Windows Media Player (WMP), prevent
from processing HTML scripts contained within
media files. |
|
| |
|
|
To secure WMP against script attacks,
disable WMP's HTML-processing feature.
Start the Registry Editor (go to Start, Run
and type Regedt32 or Regedit). Find the key
HKEY_CURRENT_USER\Software\Microsoft\MediaPlayer\Preferences
subkey. From the Edit menu, select New,
DWORD Value.
Enter a name of
PlayerScriptCommandsEnabled.
Set the new value to 0 to
prevent WMP from processing HTML scripts in
media files.
|
|
|
|
|
Windows all
versions.
|
|
| |
|
Windows Media Player, prevent Web
checks for updates. |
|
| |
|
|
When you run Windows Media Player it periodically checks the Web
for updates. But there is a way to disable this behavior.
Windows Media Player 6.4
Start the Registry Editor (go to Start, Run and type Regedt32). Find
the key HKEY_LOCAL_MACHINE\SOFTWARE\Microsoft\MediaPlayer.
Add the REG_SZ string value EnableAutoUpgrade and
set the value to No.
Windows Media Player 7.0 or later.
Start the Registry Editor (go to Start, Run and type Regedt32). Find
the key HKEY_LOCAL_MACHINE\SOFTWARE\Policies\Microsoft.
Create a new sub-key WindowsMediaPlayer. Add the REG_DWORD
string value DisableAutoUpdate and set the value to
1.
|
|
|
|
|
Windows all
versions.
|
|
| |
|
Windows XP cannot delete files. |
|
| |
|
|
There is a known bug in XP which blocks you from deleting certain file extensions. These are most often simple files like videos (AVI), MP3s or other such files. When you try to delete the file, Windows waits a few seconds before announcing that access is denied, the file is currently in use and cannot be deleted.
If you search the Internet you find more or less complicated solutions for this problem but one thing that might be worth trying before going a more complicated route like a Registry change is to open the Command Prompt and try to delete the file.
The reason for this behavior is that the bug in XP causes Explorer to read the entire contents of broken files before allowing any access to them. This bug is more obvious with media files and other large files than with smaller text files since the file just takes longer for XP to read. |
|
|
|
|
Windows XP.
|
|
| |
|
Windows XP cannot find helpctr.exe file. |
|
| |
|
|
When you click on Help and Support in the start menu, you get the error message "Windows cannot find 'Helpctr.exe'. Make sure you typed the name correctly,..." The weird thing is, if you do a search for the file (helpctr.exe), you get numerous results.
The cause of this error message may be a corrupt Registry Key. Start the Registry Editor (go to Start, Run and type Regedt32). Find
the key HKEY_LOCAL_MACHINE\SOFTWARE\Microsoft\Windows\CurrentVersion\App Paths\HELPCTR.EXE.
Make sure that the key reads HELPCTR.EXE not HELPCTR:EXE. Notice the colon between HELPCTR and EXE instead of a dot. If there is a colon replace it with a dot and Help and Support Center should start normally again.
If you have used Easy Cleaner or RegClean on your computer this might be the cause of your problems. If this is the case there is a solution at this site http://www.dougknox.com (look under Win XP Fixes) that might be worth checking out. Our readers have reported that this solution has in fact cured problems with Help and Support Center after the use of the above mentioned tools.
|
|
|
|
|
Windows XP.
|
|
| |
|
Windows XP doesn't boot and you can't access the System Restore Console. |
|
| |
|
|
With Windows XP you can use Restore Points to fix minor problems caused by misbehaving programs etc. But sometimes when Windows XP crashes completely it isn't much of an help. When you use the F8 key to boot into Safe Mode and the try to use the System Restore Console (Rstrui.exe) in the System32\Restore folder you receive various errors for missing dll files etc. If you been conscientious and planed ahead and backed up your registry you may still be able to use PE Builder to restore your registry.
The instructions for this doesn't fit on this page. Go to http://www.nu2.nu/pebuilder/ to read about PE Builder and learn how to use it.
You can learn more about how to backup the Registry on this Microsoft page.
|
|
|
|
|
Windows XP and Server 2003. |
|
| |
|
Windows XP doesn't Remember Folder Settings Anymore. |
|
| |
|
|
Windows XP is by default set to remember 400 different folder settings.
If you have more than 400 folders on your system, then they will start
to loose their settings at random. Since Windows XP is a modern system
intended for users on very big systems most users will sooner or later
hit this limit. But his limit can be increased and this annoying behavior
fixed.
Start the Registry Editor (go to Start, Run and type Regedt32). Find
the key HKEY_CURRENT_USER\Software\Microsoft\Windows\Shell.
Add the REG_DWORD value BagMRU Size and set the value
to 3e8.
Find the key HKEY_CURRENT_USER\Software\Microsoft\Windows\ShellNoRoam.
Add the REG_DWORD string value BagMRU Size and set
the value to 3e8.
Or if you prefer, you can download and use this .reg
file.
Windows XP now remembers the settings of a 1000 folders. Use the value
7d0 instead and Windows XP will remember 2000 folders.
|
|
|
|
|
Windows XP.
|
|
| |
|
Windows XP Home, Safe Mode is missing. |
|
| |
|
|
When you press the F8 key to invoke the Windows Advanced Options Menu so that you can choose the Safe Mode option you get the Windows Boot Manager instead.
This seems to be a particularly common phenomenon with Netbooks which typically have Windows XP Home installed.
To solve this and get into the Windows Advanced Options Menu, press Enter, and then immediately begin tapping the F8 key. The Windows Advanced Options Menu should now appear and you can scroll to the Safe Mode menu item. |
|
|
|
|
Windows XP.
|
|
| |
|
Windows XP Improved Search Function. |
|
| |
|
|
Did you know that when you search for files containing a word Windows XP may not search inside all your files? This behavior occurs because Windows XP doesn't search inside files that are not registered in Windows. The chance that the word that you are looking for would be inside a non registered file type may be small but if you want to be sure that you find what you are looking for you can make the following change in Windows Registry.
Start the Registry Editor. Find
the key HKEY_LOCAL_MACHINE\SYSTEM\CurrentControlSet\Control\ContentIndex.
In the right pane find the value FilterFilesWithUnknownExtensions and set the value to 1 (the default value is 0).
|
|
|
|
|
Windows XP.
|
|
| |
|
Windows XP Remote Desktop Connection connection error. |
|
| |
|
|
Windows XP's When you try to connect to a remote computer with Remote Desktop Connection or Remote Desktop Web Connection you may recive the following error: "The connection was ended because of a network error. Please try connecting to the remot computer again".
A potential race condition between the Icaapi.dll and Rdpwsx.dll dynamic-link libraries (DLLs) may cause the private certificate key on the Terminal Services server (the remote computer) not to be synchronized.
To fix this:
On the Terminal Services server (the computer you are connecting to) start the Registry Editor. Find the key HKEY_LOCAL_MACHINE\SYSTEM\CurrentControlSet\Services\TermService\Parameters. Under this registry subkey, delete the following values:
- Certificate
- X509Certificate
- X509 Certificate ID
Quit Registry Editor, and then restart the computer.
Read the full Microsoft Knowledge Base Article - 323497. |
|
|
|
|
Windows XP.
|
|
| |
|
Windows XP slow shutdown and EventID 1517. |
|
| |
|
|
If you experience slow logoffs and the computer takes a long time to save your user profile this is probably caused by a driver or application leaking registry handles. With this an administrator will typically see EventID 1517 with Windows XP and 1524 with Windows 2003 Server.
Microsoft released a service called UPHClean (User Profile Hive Cleanup Service), which checks for leaked connections to the registry and cleans them up.
This program can be downloaded from Microsoft. There you can also read the full Microsoft article.
|
|
|
|
|
Windows XP, Windows 2003 Server and also Windows 2000.
|
|
| |
|
Windows XP SP2 EventID 4226. Service Pack 2 limits the number of simultaneous incomplete outbound TCP connection attempts. |
|
| |
|
|
After Service Pack 2 has been installed on a Windows XP machine the TCP/IP stack limits the number of simultaneous incomplete outbound TCP connection attempts to 10. After the limit has been reached, subsequent connection attempts are put in a queue and will be resolved at a fixed rate. Under normal operation, when applications are connecting to available hosts at valid IP addresses, no connection rate-limiting will occur. When it does occur, a new event, with ID 4226, appears in the system's event log. This is a good change. This change helps to limit the speed at which malicious programs, such as viruses and worms, spread to uninfected computers.
However, if you use programs that open connections to every single source it can find on the network some users with high speed connections may find themselves choked.
There is a patch available at http://www.lvllord.de/ which fixes the problem. The patch will default to a maximum of 50 simultaneous connections. With the higher number of connections the security benefits are almost the same, but less of nuisance to the normal user.
Read the full Microsoft Article - Changes to Functionality in Microsoft Windows XP Service Pack 2. |
|
|
|
|
Windows XP with Service Pack 2.
|
|
| |
|
Windows XP's Task Manager default setting doesn't show PIDs. |
|
| |
|
|
Windows XP's Task Manager default setting doesn't show PIDs. PIDs are useful when you for example need to identify which program is accessing the Internet. If you type
Netstat -no you get a list of programs that are currently accessing the Internet, what IP number and port that program is using and also its PID. Useful when tracking erroneous software, trojan horses etc.
Since the Windows XP Task Manager's default setting doesn't show PIDs, make it do so by choosing its View, then the Select Columns dialog. Then check "PID" and click OK.
|
|
|
|
|
Windows XP (the netstat can of course be used with all versions of Windows).
|
|
| |
|
You cannot access your old and trusty NAS nor any of its files from your brand new Vista machine. |
|
| |
|
|
Users of Microsoft's Vista operating system may experience that they cannot connect to their trusty old NAS server. The same also holds true if they try to connect Vista to an older Linux system on their local network. The technical reason behind this is because Microsoft Vista's default security policy is to only use NTLMv2 authentication and NTLMv2 authentication is not supported by older versions of Samba. Many NAT servers are based on Linux and Samba.
Newer Linux based systems run Samba 3 and up and should note be affected by this problem. NTLMv2 authentication is supported in Samba 3.0.
To get Vista to work with older versions of Samba is very simple. The best way is to change your Local Security Policy but depending on your version of Vista Local Security Policy may not be accessible, this may apply to you if you have Vista Home or Vista Home Premium.
To change Vista's behavior through Local Security Policy:
Open the Run command and type secpol.msc and click OK. Navigate to Local Policies and then Security Options. Find the policy Network Security: LAN Manager authentication level and open it. In the dialog box change the setting to: LM and NTLM - use NTLMV2 session security if negotiated. Click OK and reboot your system.
Windows Vista will now be able to view network drives based on Samba servers.
If Local Security Policy is not available to you there is a registry hack you can use:
Start the Registry Editor. Find the key HKEY_LOCAL_MACHINE\System\CurrentControlSet\Control\Lsa\LMCompatibilityLevel. Set the REG_DWORD value 1.
If it doesn't already exist, create a DWORD value named LmCompatibilityLevel with the value of 1.
| |
|
|
|
Windows Vista.
|
|
|


 [RETURN to INDEX]